
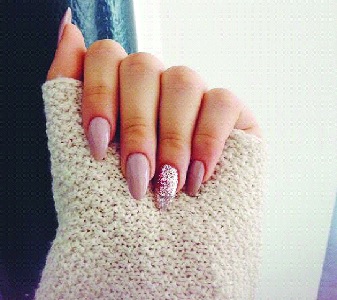

Elegant, feminine and endlessly versatile, almond-shaped nails have become a beauty favorite for a reason. With gently tapered sides and a softly rounded tip, the shape creates the illusion of longer, slimmer fingers while working beautifully with everything from minimalist nude polish to elaborate nail art. The best part? You do not need extremely long nails to achieve the look. With the right shaping technique and a little care, almond nails can look polished and sophisticated at almost any length.
What makes almond nails different?
An almond nail is narrower at the tip than at the base, with the sides gradually curving inward before meeting at a rounded point. Unlike the sharper stiletto shape, the almond tip is softer and more wearable.
The shape is particularly flattering because it visually elongates the nail bed. It can also make short or wider fingers appear more slender.
Start with the right length
Before reaching for the nail file, decide how much length you want to retain. For a classic almond shape, the nails generally need some free edge because the tapered sides require enough length to create a visible curve. However, you do not need dramatically long nails. If your nails are naturally short, allow them to grow slightly before shaping. Alternatively, extensions or press-on nails can create the required length.
File, don’t force the shape
The key to almond nails is gradual shaping. Begin with clean, dry nails and use a fine-grit nail file. Avoid aggressively sawing back and forth, particularly if your nails are thin or prone to splitting. Start from one side and file diagonally towards the centre of the tip. Repeat on the other side, checking regularly to make sure both sides are symmetrical. Do not try to create the pointed tip immediately. The almond shape should develop gradually from the sides towards the centre.
Keep the tip softly rounded
This is where almond nails differ from stiletto nails.
Once the sides have been tapered, gently soften the tip. The end should have a rounded point rather than a sharp peak. Think of the shape of an almond: gently pointed at both ends, but never needle-sharp.
Check every nail from different angles
Symmetry can be difficult to judge when you look at one nail at a time. After filing, hold your hand palm-up and look at the nails together. Check whether the tips follow a similar curve and whether the sidewalls are evenly tapered. It can also help to photograph your hands from above. Small differences in shape that are easy to miss while filing often become obvious in a photograph.
Don’t over-file the sides
One common mistake is removing too much from the sidewalls in an attempt to make the nails look slimmer. Over-filing can weaken the nail and may make it more vulnerable to breaking. The sides should taper naturally rather than becoming extremely narrow. If you have naturally thin or brittle nails, retain a little more width and concentrate on creating a gentle curve.
Smooth the edges
Once you have achieved the basic almond shape, lightly run the file along the free edge to remove rough areas. Avoid repeatedly filing the same spot. A few controlled strokes are usually enough.
Finish by gently smoothing the surface only if necessary. Excessive buffing can thin the natural nail.



Be the first to comment